
Docker gives an incredible flexibility in terms of having a fully-fledged local environment, dedicated for development purposes. In this article I will show you how to establish a stable and very reliable Docker environment that consists of a LEMP stack (with Laravel as a framework of choice).
At the end of this article, you will get a set of containers running PHP, Nginx, MySQL, Redis, Mailhog and phpMyAdmin. All combined together provide a very decent local stack, ideal for crafting PHP applications.
Assumptions
It is assumed that at this point you have Docker already installed and running. If this is not the case, then follow the official guide on how to install Docker on Mac. If you are running different operating system, follow Docker's official guideline that matches your OS.
💡 This article will use ~/Code as the destination location for a simple LEMP project we are going to build here.
Preparations
Create a set of new directories inside ~/Code to put the project we are building.
mkdir -p foo-com/docker/services/{app,web} foo-com/docker/volumes/{mysql,redis} foo-com/src
cd foo-com
tree
This should give you the following directory structure:
$ tree
.
├── docker
│   ├── services
│   │   ├── app
│   │   └── web
│   └── volumes
│       ├── mysql
│       └── redis
└── src

8 directories, 0 files
Hey! Calling
treegives mecommand not found: tree
Solve it by installing the package via Homebrew:
brew install treeSource Control
It is very likely that you are going to use Git as your source control, hence some extra steps are needed. Within both mysql and redis directories, create new empty file and name it .gitkeep.
touch docker/volumes/mysql/.gitkeep
touch docker/volumes/redis/.gitkeep
Now in the root create .gitignore file with the following content:
!docker/volumes/mysql
docker/volumes/mysql/*
!docker/volumes/mysql/.gitkeep

!docker/volumes/redis
docker/volumes/redis/*
!docker/volumes/redis/.gitkeep

.DS_Store
.idea
What this is telling us?
We use Docker volumes as a way to persist our data. This setup guarantees that once we shut down Docker containers or even turn off our host machine, no data will be lost. Obviously we don't want any clutter to be part of the repository, hence we simply ignore the content within (not the directories themselves). Last two lines are optional and depend on both IDE and OS.
Docker Services
This is the core part of this article.
Let's start with the main app.dockerfile service.
touch docker/services/app/app.dockerfileContent of the app.dockerfile:
FROM php:8.1-fpm

WORKDIR /var/www

RUN apt-get update && apt-get install -y \
    build-essential \
    curl \
    git \
    jpegoptim optipng pngquant gifsicle \
    locales \
    unzip \
    vim \
    zip

# Clear cache
RUN apt-get clean && rm -rf /var/lib/apt/lists/*

# Install PHP extensions

# Graphics Draw
RUN apt-get update && apt-get install -y \
    libfreetype6-dev \
    libjpeg62-turbo-dev \
    libpng-dev \
    && docker-php-ext-configure gd --with-freetype --with-jpeg \
    && docker-php-ext-install -j$(nproc) gd

# Multibyte String
RUN apt-get update && apt-get install -y libonig-dev && docker-php-ext-install mbstring

# Miscellaneous
RUN docker-php-ext-install bcmath
RUN docker-php-ext-install exif
RUN docker-php-ext-install pdo_mysql

# Install Composer
RUN curl -sS https://getcomposer.org/installer | php -- --install-dir=/usr/local/bin --filename=composer

# Install specific version of Node.js with npm through nvm
SHELL ["/bin/bash", "--login", "-c"]
RUN curl -o- https://raw.githubusercontent.com/nvm-sh/nvm/v0.39.1/install.sh | bash
RUN nvm install v16.17.0

# Install Cron
RUN apt-get update && apt-get install -y cron
RUN echo "* * * * * root php /var/www/artisan schedule:run >> /var/log/cron.log 2>&1" >> /etc/crontab
RUN touch /var/log/cron.log

CMD bash -c "cron && php-fpm"
Explain please?
- Our Laravel application will be based on PHP 8.1-fpm image
- We define a
WORKDIRwhich represents the relative path to the destination location for the app's files - We install both mandatory tools that are needed down the line
- We install essential PHP extensions (needed by the framework)
- Graphics Draw Library for image creation and processing
- Multibyte String Library is required by Laravel along with other extensions like
bcmathorpdo_mysql. Our list does not contain all of the extensions listed by the official Laravel documentation, because most of them are already installed and enabled by default. Later we can always jump into the app's container and check available extensions by usingphp -m
- We install Composer as this is our backend package manager
- We install Node.js to be able to use the npm package manager to work with our frontend assets. This was surprisingly the most painful part to define in this file. 🤮 I wanted to have full control over the version of Node.js I was going to install, however none of the solutions on how to install it worked as expected with the PHP image I have picked. 🥴 After multiple attempts, the easiest way was to use additional tool called nvm, to install a specific version of Node.js (with no issues down the line) 🎉
- Finally, we want to have Laravel Scheduler up and running in the background. We install the
cronpackage, next we add the only entry intocrontabwe need. Lastly we create the log file so that we can tail it when needed
Now, create 2 essential files for the web service.
touch docker/services/web/web.dockerfile
touch docker/services/web/vhost.conf
Content of the web.dockerfile:
FROM nginx:1.21

COPY vhost.conf /etc/nginx/conf.d/default.conf

RUN ln -sf /dev/stdout /var/log/nginx/access.log
RUN ln -sf /dev/stderr /var/log/nginx/error.log
Content of the vhost.conf:
server {
    listen 80;
    index index.php index.html;
    root /var/www/public;

    location / {
        try_files $uri /index.php?$args;
    }

    location ~ \.php$ {
        fastcgi_split_path_info ^(.+\.php)(/.+)$;
        fastcgi_pass app:9000;
        fastcgi_index index.php;
        include fastcgi_params;
        fastcgi_param SCRIPT_FILENAME $document_root$fastcgi_script_name;
        fastcgi_param PATH_INFO $fastcgi_path_info;
    }
}
Explain please?
- Our web server (service) will be based on Nginx 1.21 image
- We copy server settings (
vhost.conf) into container's location (where the default file is located) so that we override it- Server is going to listen on port 80
- Server's root directory is the exact location of Laravel's public directory
- We establish a sort of a connection between web service and the app service that will listen on port
9000for incomming PHP requests (fastcgi_pass app:9000)
- We create 2 symbolic links to output logs into a file
Main docker-compose.yml File
In the root type:
touch docker-compose.ymlAs content:
version: "3.8"
services:
  # Application
  app:
    build:
      context: ./docker/services/app
      dockerfile: app.dockerfile
    working_dir: /var/www
    volumes:
      - ./src:/var/www
  # Web Server
  web:
    build:
      context: ./docker/services/web
      dockerfile: web.dockerfile
    working_dir: /var/www
    volumes:
      - ./src:/var/www
    ports:
      - "80:80"
  # Database
  database:
    image: mysql:8.0.25
    volumes:
      - ./docker/volumes/mysql:/var/lib/mysql
    environment:
      MYSQL_DATABASE: ${DB_DATABASE}
      MYSQL_ROOT_PASSWORD: ${DB_PASSWORD}
      MYSQL_PASSWORD: ${DB_PASSWORD}
      MYSQL_USER: ${DB_USERNAME}
    ports:
      - "3306:3306"
  # Database Management
  pma:
    image: phpmyadmin:5.1
    environment:
      - PMA_ARBITRARY=1
      - PMA_HOST=${DB_HOST}
      - PMA_USER=${DB_USERNAME}
      - PMA_PASSWORD=${DB_PASSWORD}
      - PMA_PORT=${DB_PORT}
    depends_on:
      - "database"
    ports:
      - "8888:80"
  # Caching
  redis:
    image: redis:alpine
    volumes:
      - ./docker/volumes/redis:/data
    ports:
      - "6379:6379"
  # Mailing Server
  mailhog:
    image: mailhog/mailhog:latest
    logging:
      driver: "none"
    ports:
      - "1025:1025"
      - "8025:8025"
Let's finally break down this one…
This is the main YAML file where we define all:
- services
- networks
- volumes
for the multi-container Docker application we are creating.
There are actually only two main sections of this file:
version- we specify version of the Compose file to be 3.8. Follow the link to explore this topic furtherservices- we define all of containers that combined together create our multi-containerized Laravel app- Application
app - Web Server
web - Database
database - Database Management
pma - Caching
redis - Mail Server
mailhog
- Application
Application is build upon local app.dockerfile file. The key thing here is to define a volume between local src directory and /var/www within a container, as this is the place for a sample application.
Web Server same as before, local web.dockerfile file is the source to create a Docker image. We define the same type of volume as before, but more importantly we specify on which port our web server with Laravel will be running. Because sometimes macOS can take over port 80, for safety we will use 8080 (left side) on the host. This will point to port 80 (right side) within a container. To ensure that all of the essential services are available before we boot the web service, we specify the depends_on key with list of other services, that Docker will raise prior to the web service.
Database is build based on external image of a particular version of MySQL. We mount volume to keep any data persistent between container runs. This mounts host's ./docker/volumes/mysql into container's /var/lib/mysql. In terms of the port number, we pick 3306 for both ends.
Where the credentials are coming from?
We are going to use Laravel's .env file (./src/.env). Carry on reading and everything will become clear.
Database Management is an optional container to conveniently manage Laravel's database. Since phpMyAdmin is a browser tool, we specify another port (8888) on the host to point to port 80 within a container. If you prefer to use external application to connect to the database, remember to use 127.0.0.1 as a host address. Remaining credentials will be taken (as mentioned before) from the .env file. This container obviously depends_on the database.
Caching is pulled from the alpine version of the Redis image. Same as in case of the database, we mount host's ./docker/volumes/redis into container's /data to persist any cached data.
Mailing Server is the latest Mailhog Docker image. We specify a pair of ports. 1025 for the SMTP server and 8025 for the HTTP server because Mailhog is a web tool, similarly to phpMyAdmin. We also specify that we do not want a container to store any logs. This is a purely disposable service.
Application Source
So far we did not cover anything about the application itself. If you have existing Laravel application, move (copy) it into the ./src directory so that Laravel's .env file and public directory are directly underneath. In case you are starting from scratch, simply go to this directory and clone Laravel repository there.
cd src
git clone [email protected]:laravel/laravel.git .
The dot at the end is not a typo. It tells git to clone directly into src without creating extra directory.
Usage
In the root of your project, create new file called local.sh.
touch local.shPaste the following code as content:
#!/bin/bash

function _up() {
  docker-compose --env-file ./src/.env up -d
}

function _stop() {
  docker-compose --env-file ./src/.env stop
}

function _rebuild() {
  docker-compose --env-file ./src/.env up -d --build --force-recreate --remove-orphans
}

function _ssh() {
  docker-compose --env-file ./src/.env exec app bash
}

case $1 in
"start") _up ;;
"stop") _stop ;;
"rebuild") _rebuild ;;
"ssh") _ssh ;;
esac
This is a helper script to use each time your have to start, stop or rebuild your containers. It also allows you to "go inside" your app container so that we can use all of the goodies provided by the app.dockerfile. Everything without memorizing long commands with a bunch of arguments.
In the root of your project:
- to start all containers type
./local.sh start(the-dargument means that we run containers in the detached mode, meaning they run in the background, allowing you to carry on with other commands) - to stop all containers type
./local.sh stop - to rebuild containers in case you have modified a
dockerfileordocker-compose.ymltype./local.sh rebuild - to go inside the Application container type
./local.sh ssh
For each docker-compose invocation, we supply environmental variables by pointing Docker to Laravel's .env. There is no need to hardcode any credentials at all.
I have cloned Laravel's fresh repository - I don't have the
.env!
If this is the case, then simply create it and populate all values based on the .env.example. Just keep in mind the following settings. The DB_HOST should be equal to Docker's service name! DB_PORT should match the port defined in docker-compose.yml.
DB_CONNECTION=mysql
DB_HOST=database
DB_PORT=3306
DB_DATABASE=foo
DB_USERNAME=user
DB_PASSWORD=password
For caching section:
REDIS_HOST=127.0.0.1
REDIS_PASSWORD=null
REDIS_PORT=6379
For mail section:
MAIL_MAILER=smtp
MAIL_HOST=mailhog
MAIL_PORT=1025
MAIL_USERNAME=null
MAIL_PASSWORD=null
MAIL_ENCRYPTION=null
MAIL_FROM_ADDRESS="foo@bar"
MAIL_FROM_NAME="${APP_NAME}"
First Boot
Now it is finally time to combine and build everything together. In the root of your project type ./local.sh start. The first run always takes a lot of time, as most likely nothing is cached and Docker has to pull a lot of images.
If everything went well you should see output similar to:
$ ./local.sh start
[+] Running 6/6
 ⠿ Container foo-com-database-1  Started                                     1.2s
 ⠿ Container foo-com-mailhog-1   Started                                     1.1s
 ⠿ Container foo-com-redis-1     Started                                     1.1s
 ⠿ Container foo-com-app-1       Started                                     0.5s
 ⠿ Container foo-com-web-1       Started                                     0.6s
 ⠿ Container foo-com-pma-1       Started                                     1.5s
At this point we should have access to our application at localhost:80.
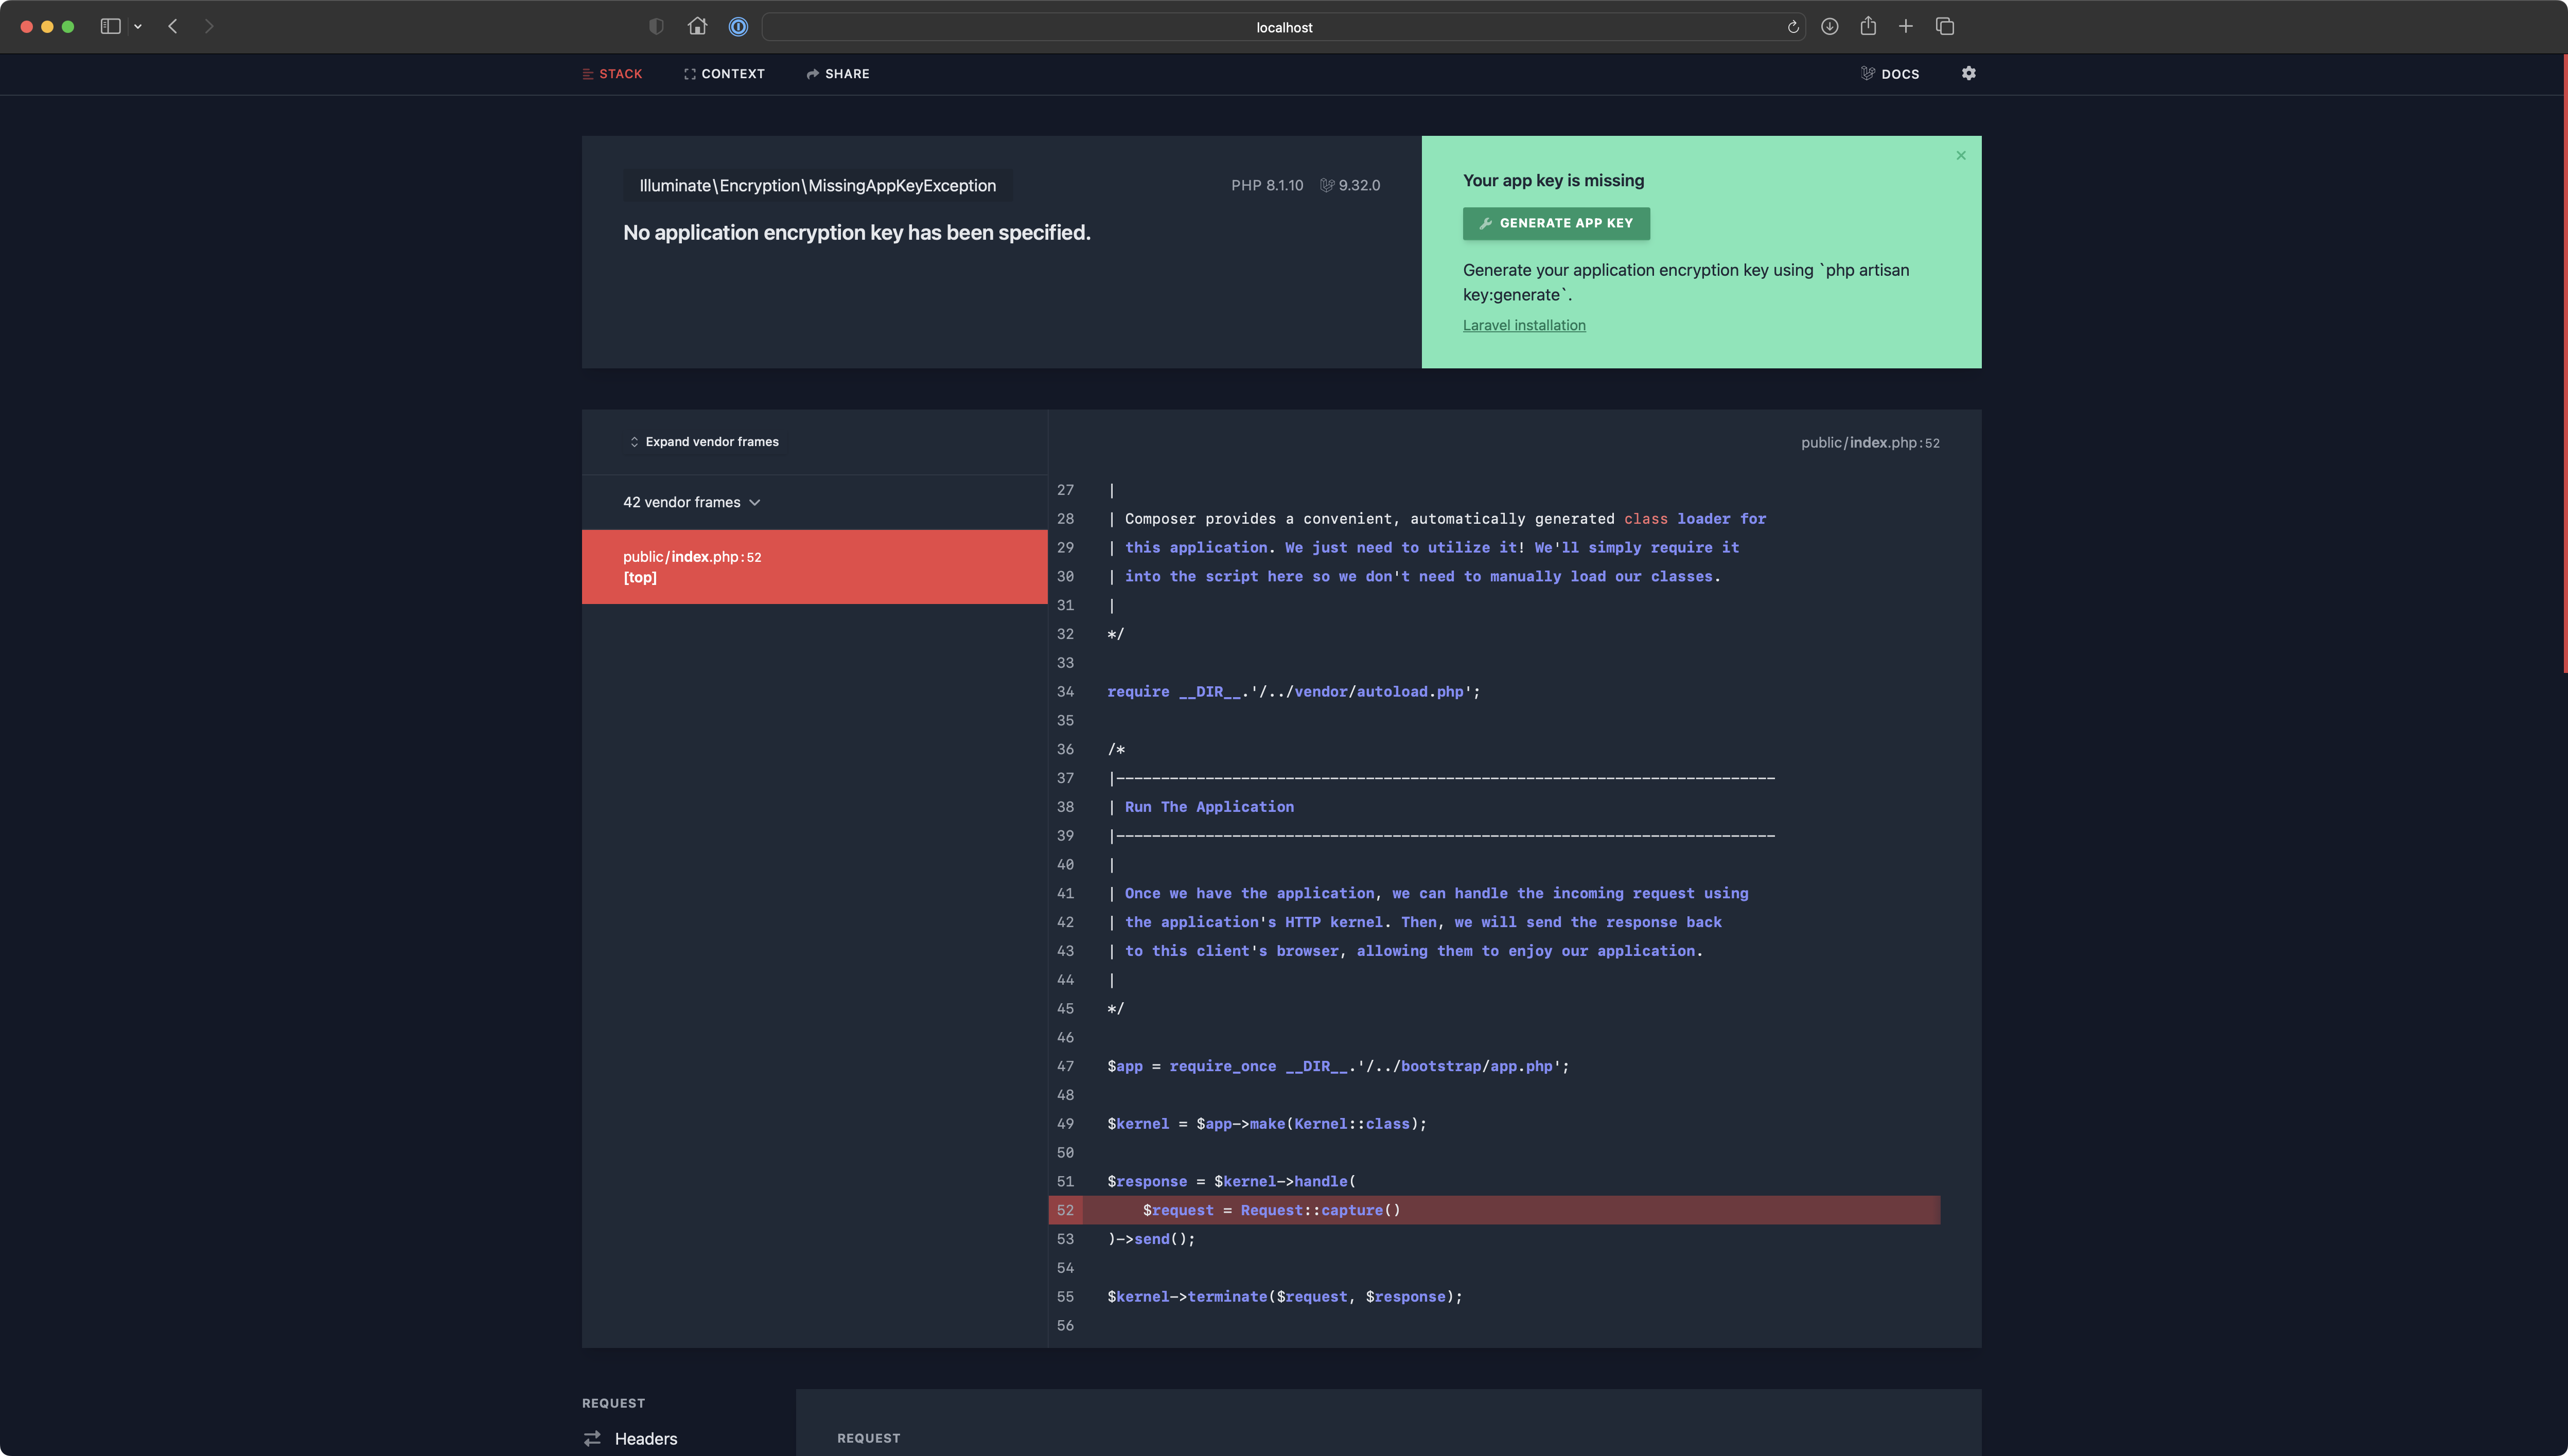
Open http://localhost:80 in any browser of your choice.

vendor directory for backend is simply missing. We will fix that in the next step.Let's jump into application's container.
To do so, type ./local.sh ssh.
$ ./local.sh ssh
root@43e8b64ef81f:/var/www#
We are now in the WORKDIR inside a container. This is the root location of our project.
Check if essential commands are available by typing one of the following:
php -vphp -mwhich composerwhich nodewhich npm
You should get the relevant output, like
root@43e8b64ef81f:/var/www# php -v
PHP 8.1.10 (cli) (built: Sep 13 2022 10:21:04) (NTS)
Copyright (c) The PHP Group
Zend Engine v4.1.10, Copyright (c) Zend Technologies
or
root@43e8b64ef81f:/var/www# composer
   ______
  / ____/___  ____ ___  ____  ____  ________  _____
 / /   / __ \/ __ `__ \/ __ \/ __ \/ ___/ _ \/ ___/
/ /___/ /_/ / / / / / / /_/ / /_/ (__  )  __/ /
\____/\____/_/ /_/ /_/ .___/\____/____/\___/_/
                    /_/
Let's now pull all of the dependencies.
Type composer install.
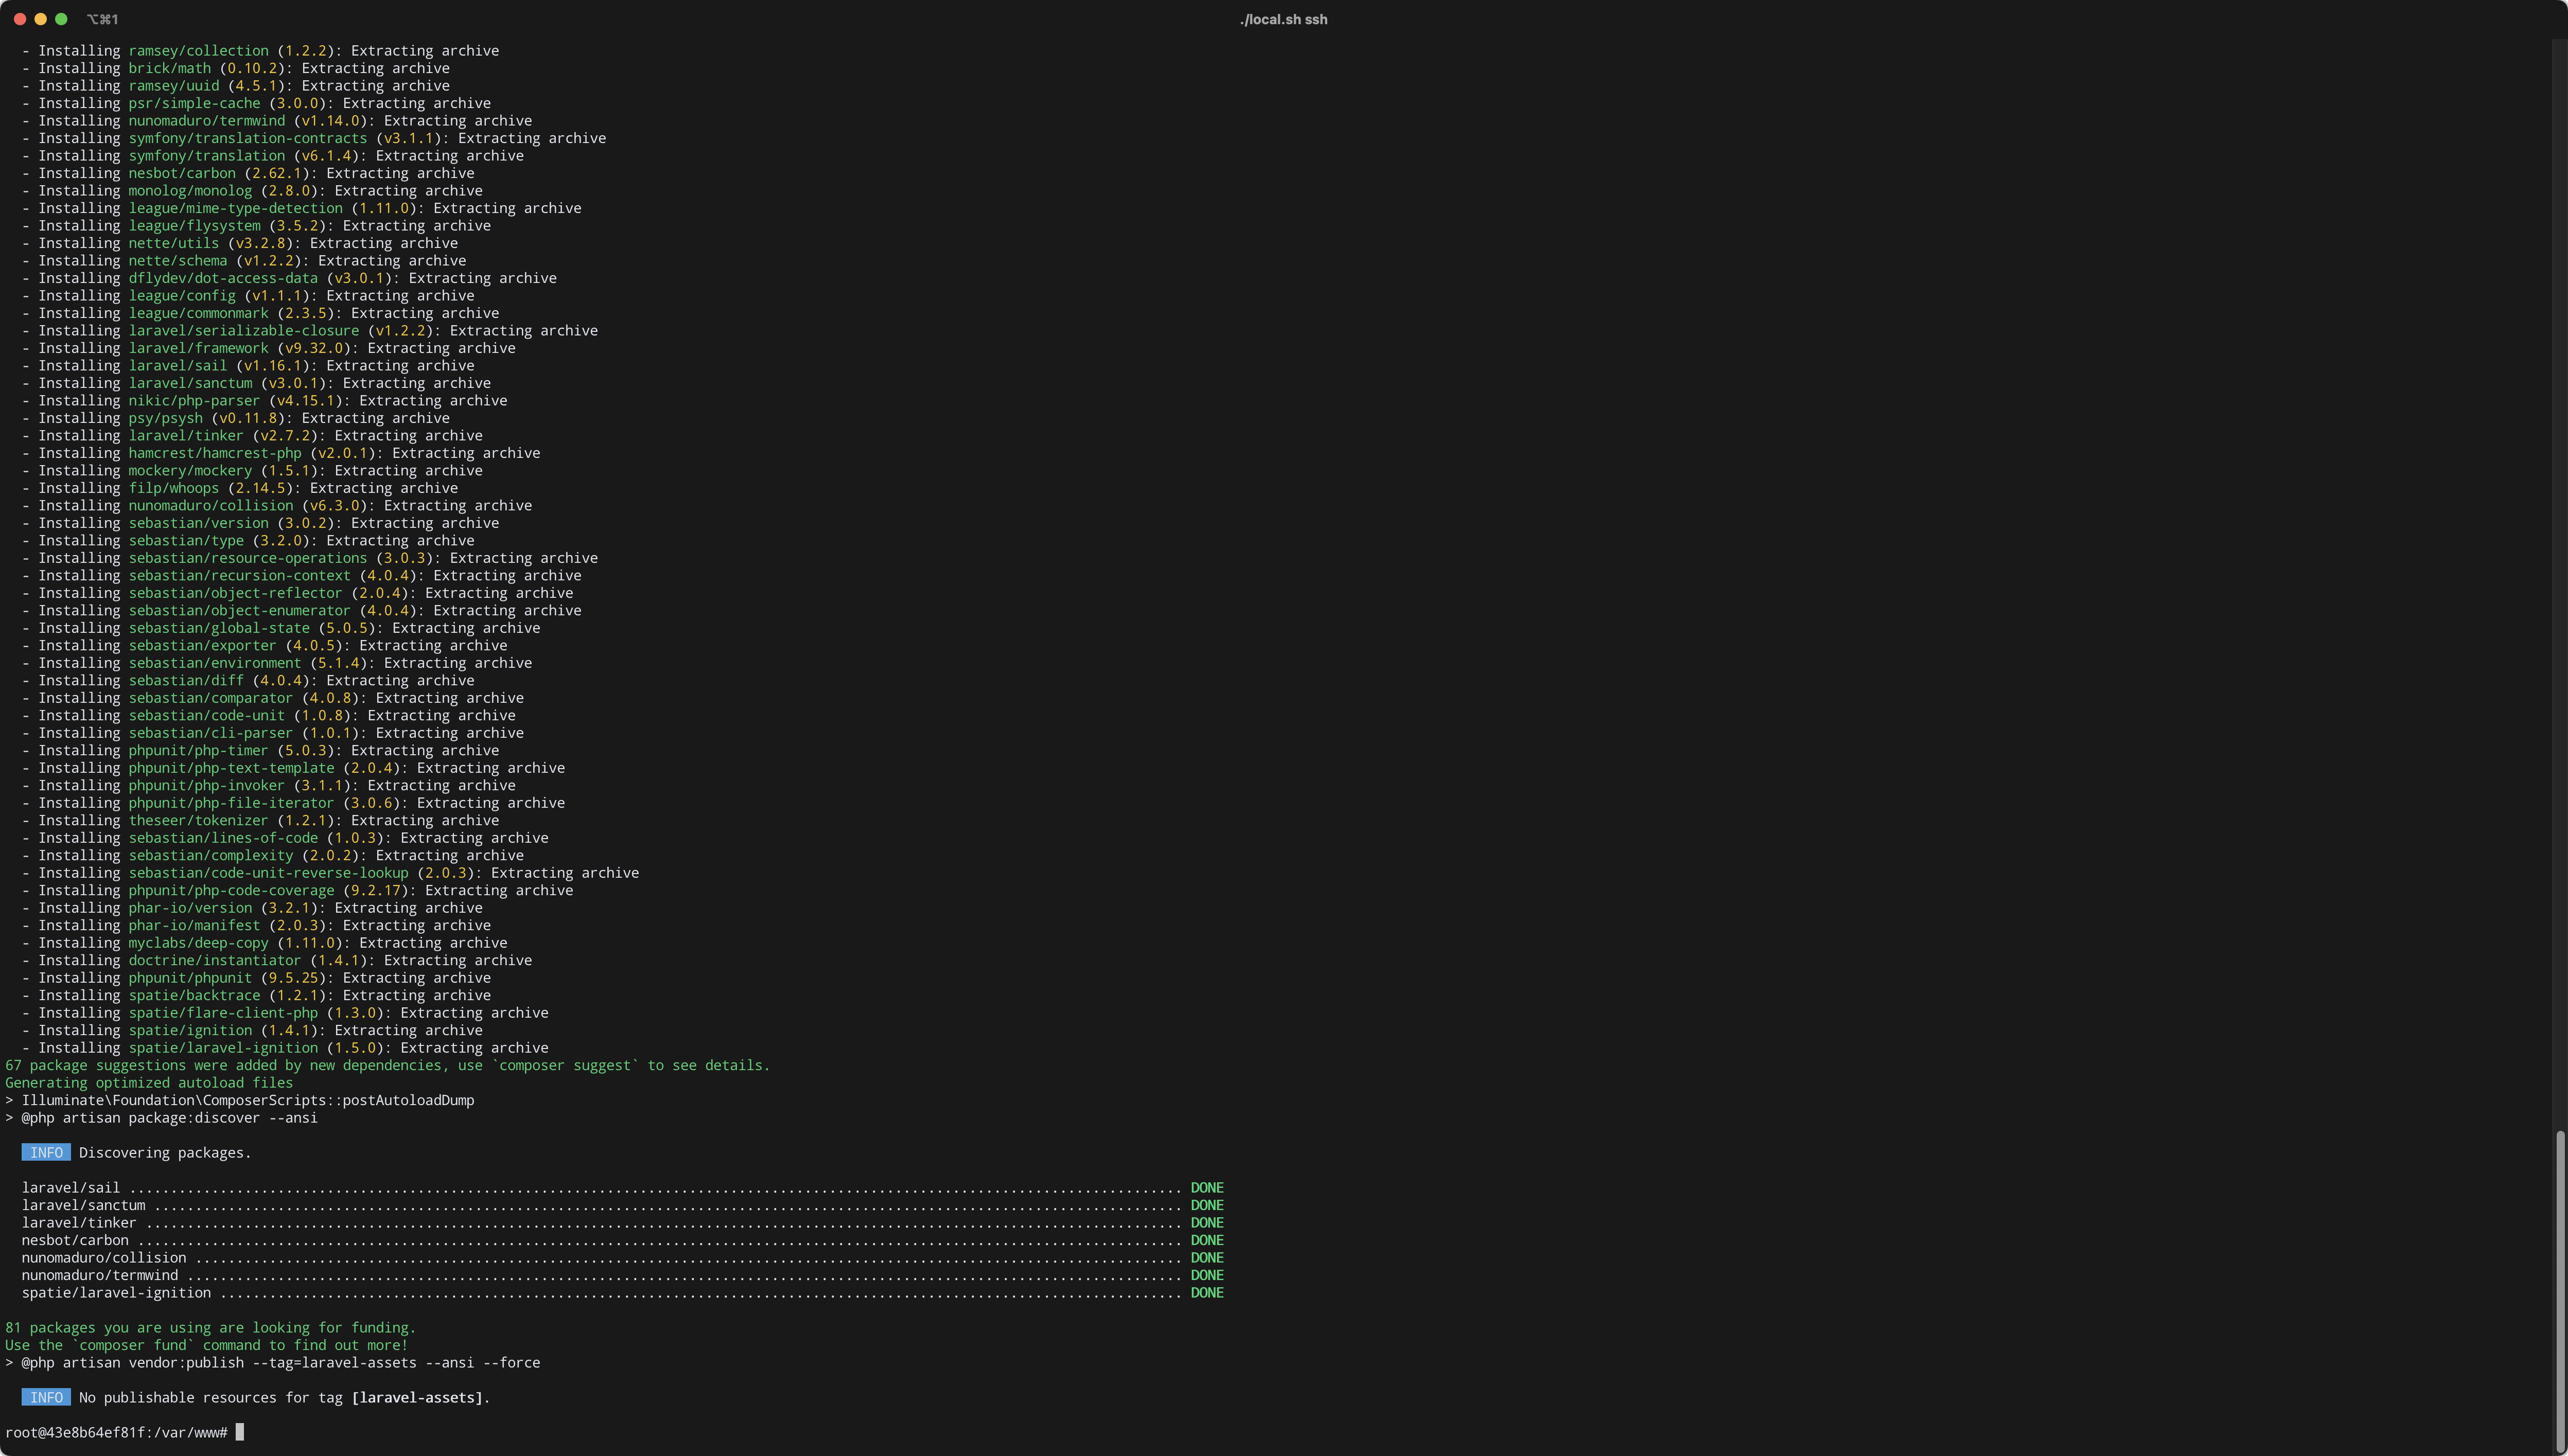
Refresh your browser now.
Type php artisan key:generate
Output should be similar to:
root@43e8b64ef81f:/var/www# php artisan key:generate
INFO Application key set successfully.
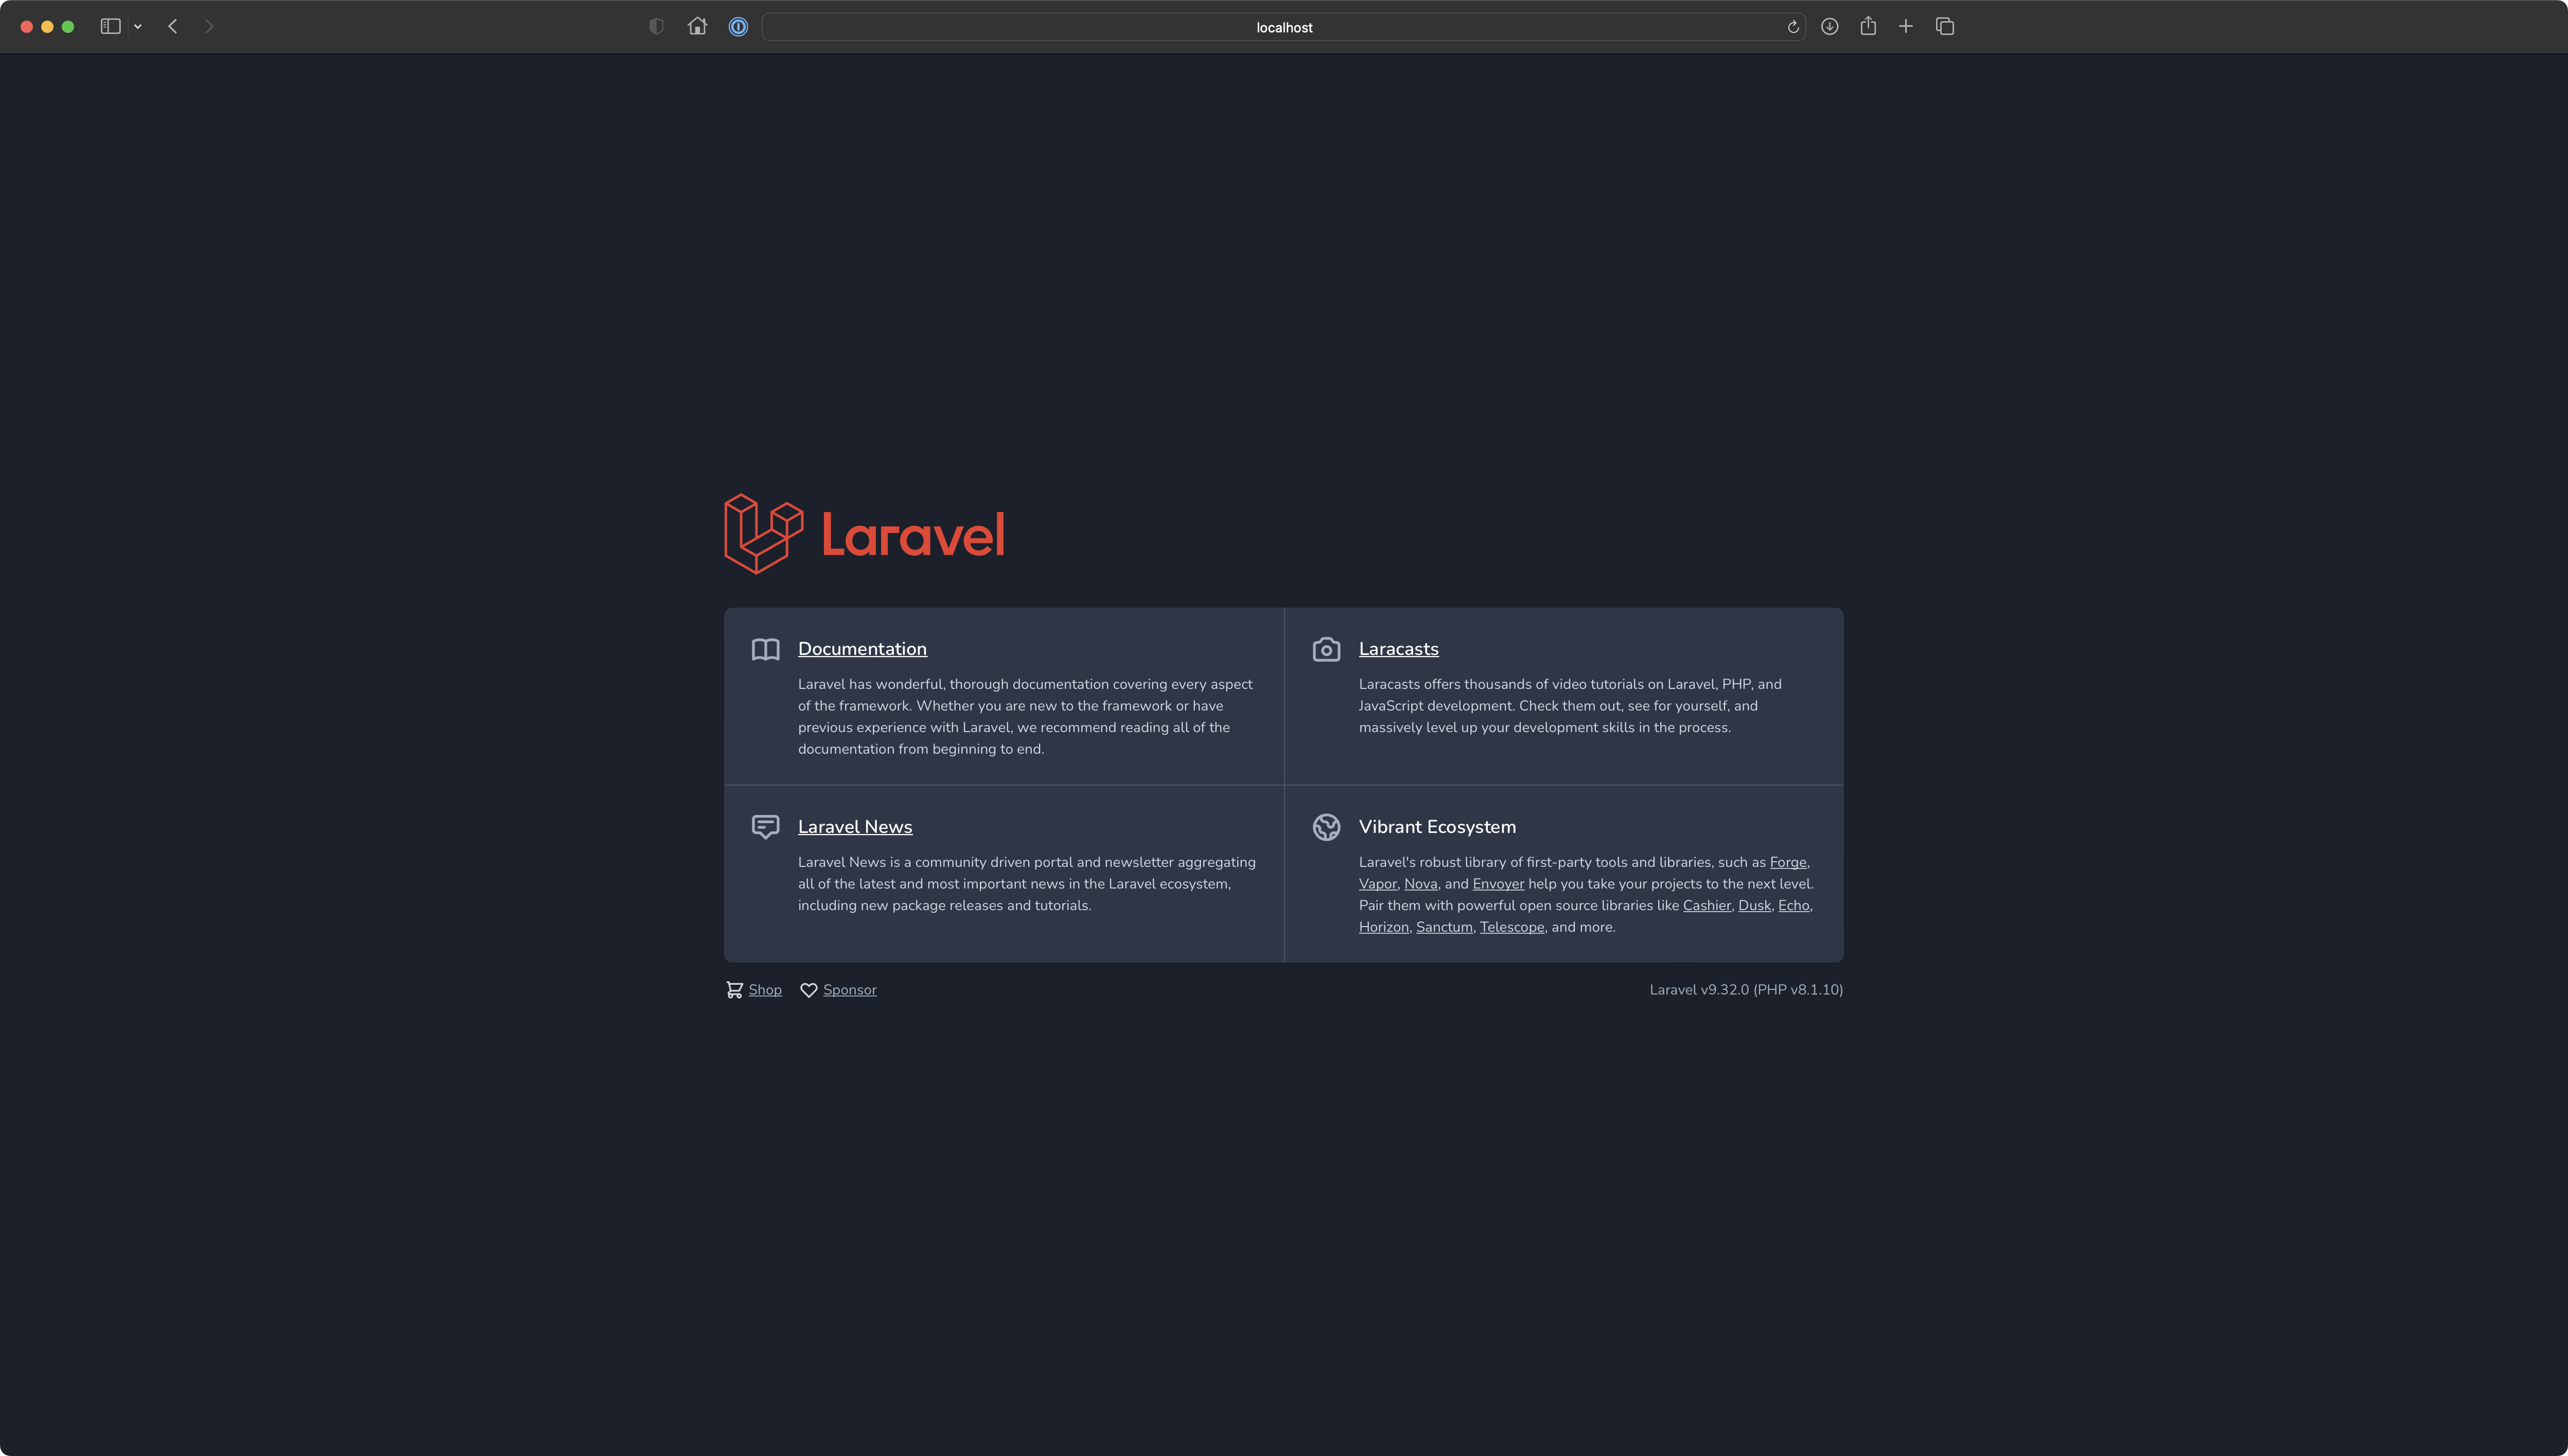
root@43e8b64ef81f:/var/www#Refresh the page:
If your project has package.json then as you may expect, running commands like npm ci or npm run production should create node_modules directory, pull everything that is needed and compile frontend assets (this depends entirely on your case). We will not deal with frontend and JavaScript too much here.
Database Access
In this chapter we are quickly going to cover a database container and ensure that connection between database and Laravel is being established correctly. Let's start with the phpMyAdmin. This is by far the quickest way to access our database.
Go to http://localhost:8888 - this port number has been given to phpMyAdmin.
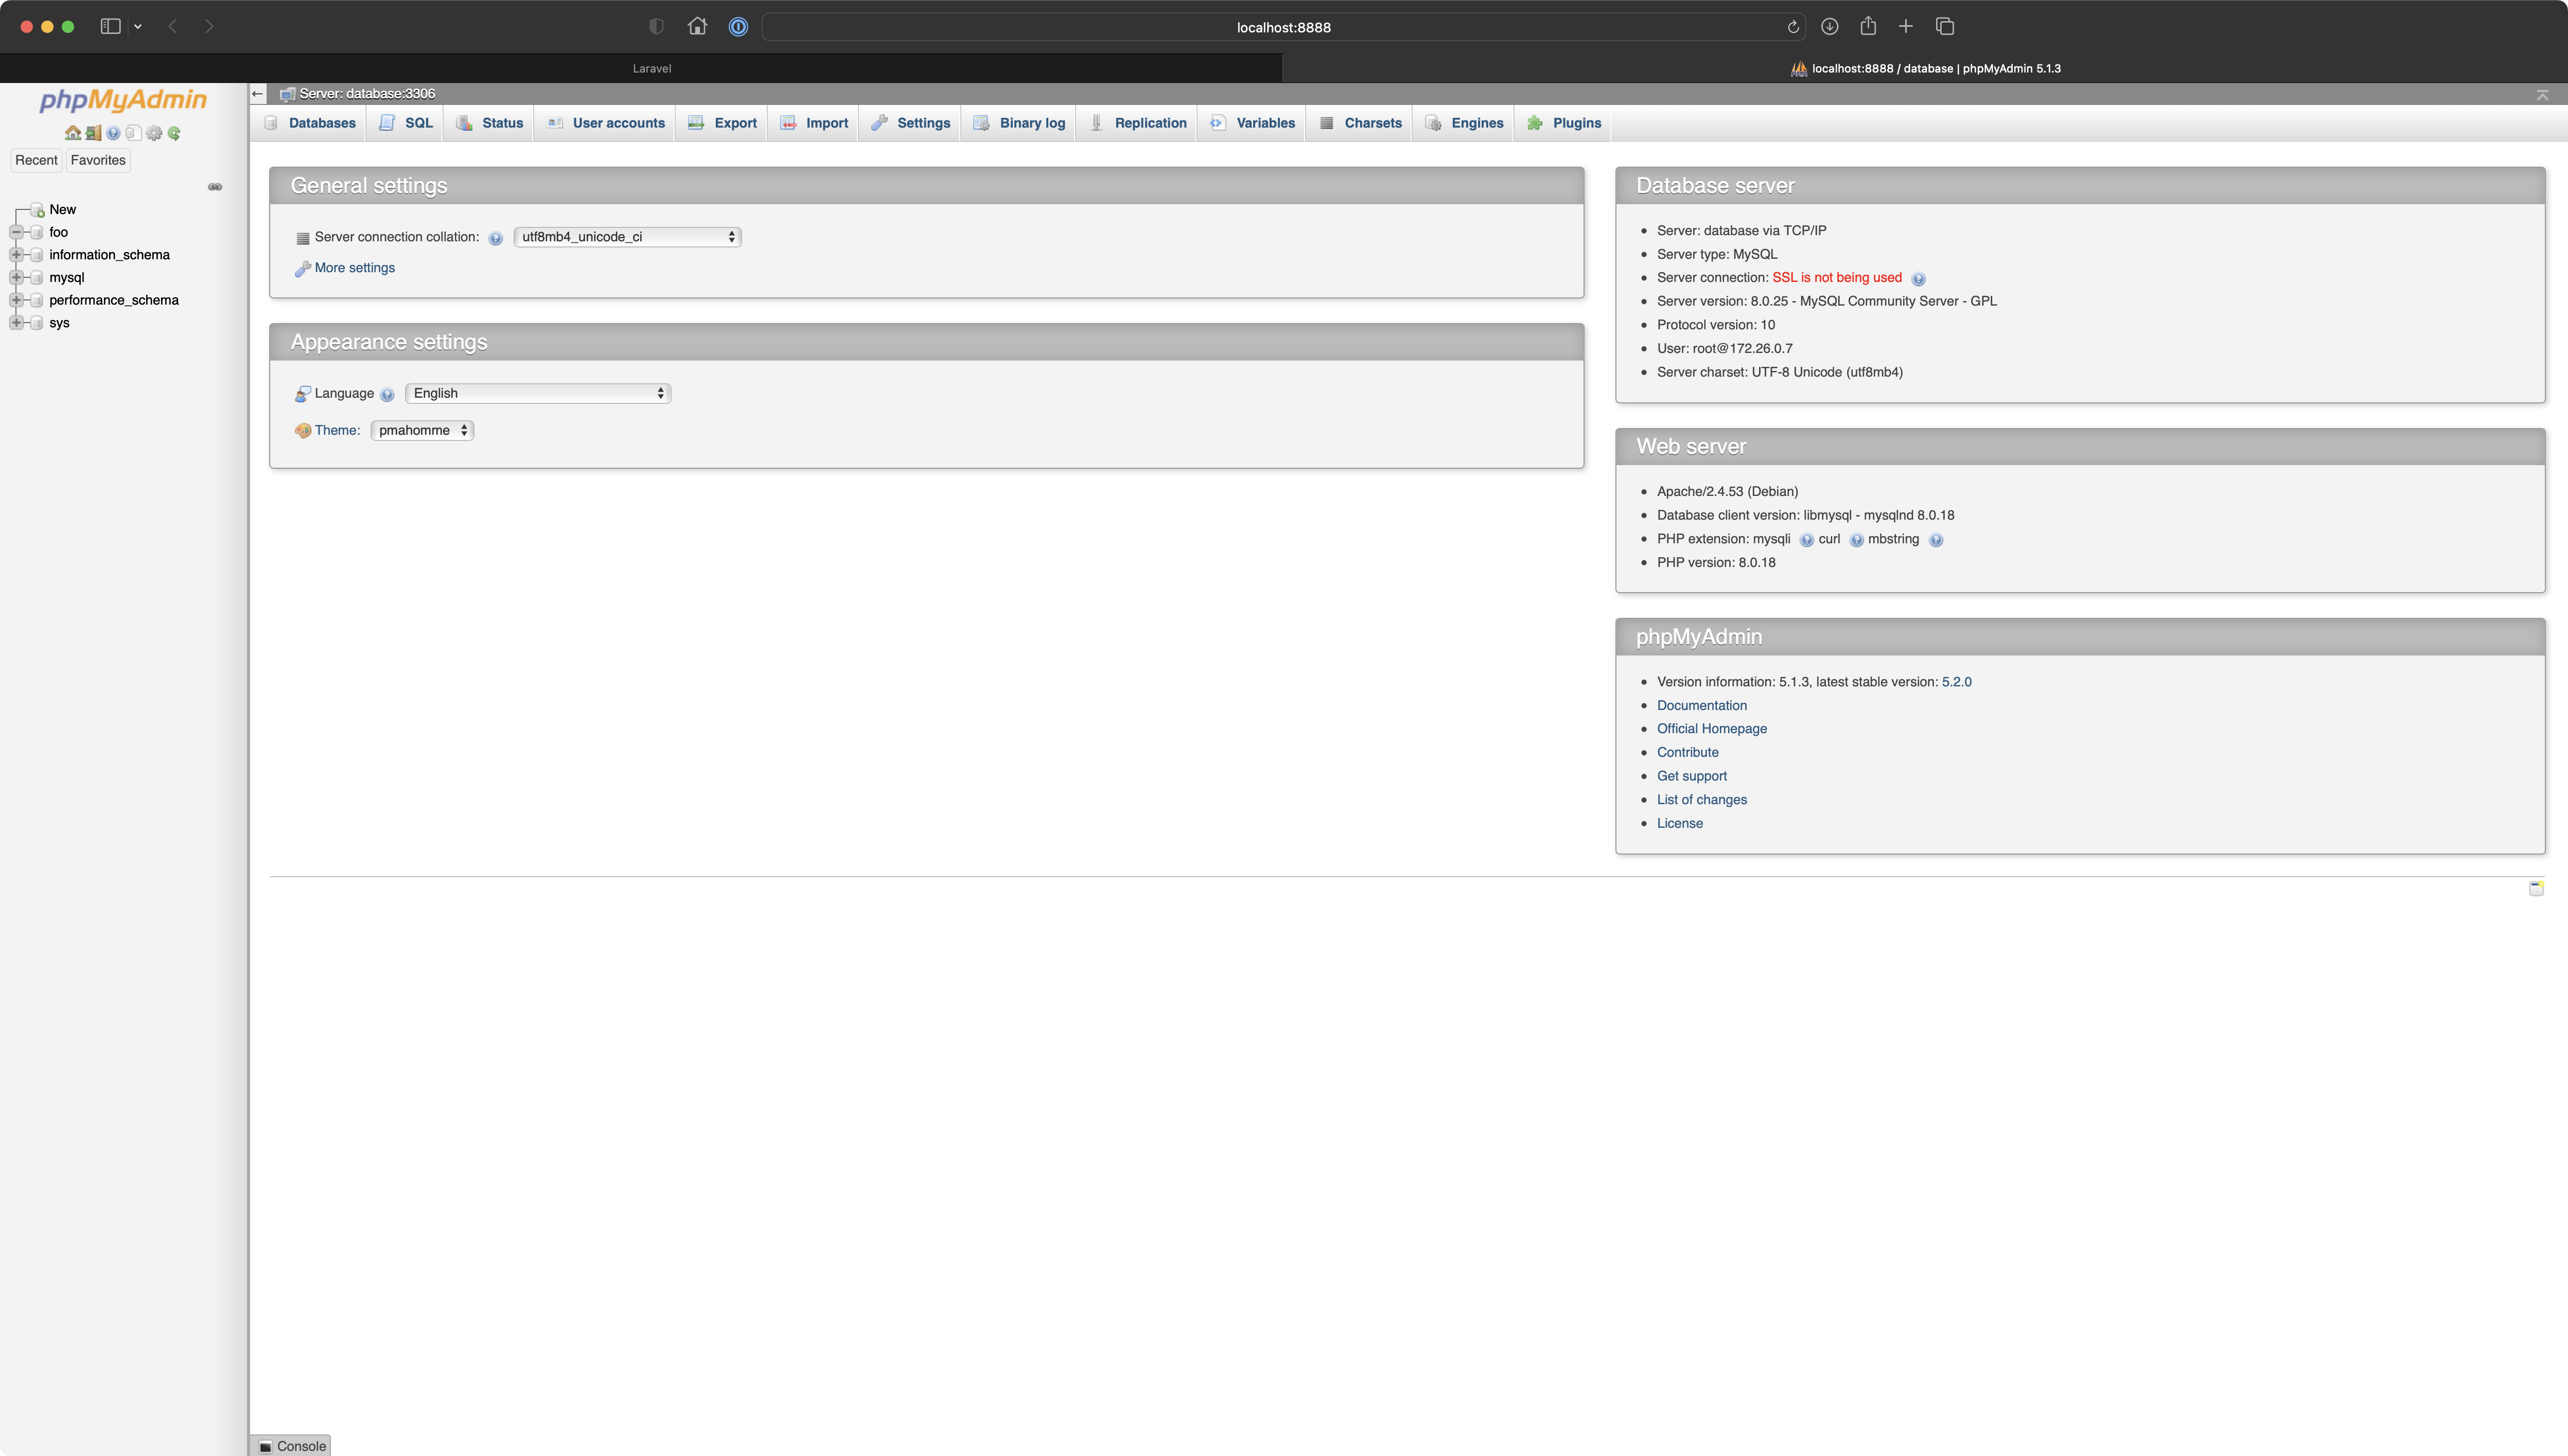
foo is visible on the left-hand sidebar. It exists but contains nothing. Next step will be to populate it with some initial data and therefore evaluate if the connection is being established with no issues.Inside app's container (./local.sh ssh) type php artisan migrate:fresh --seed.
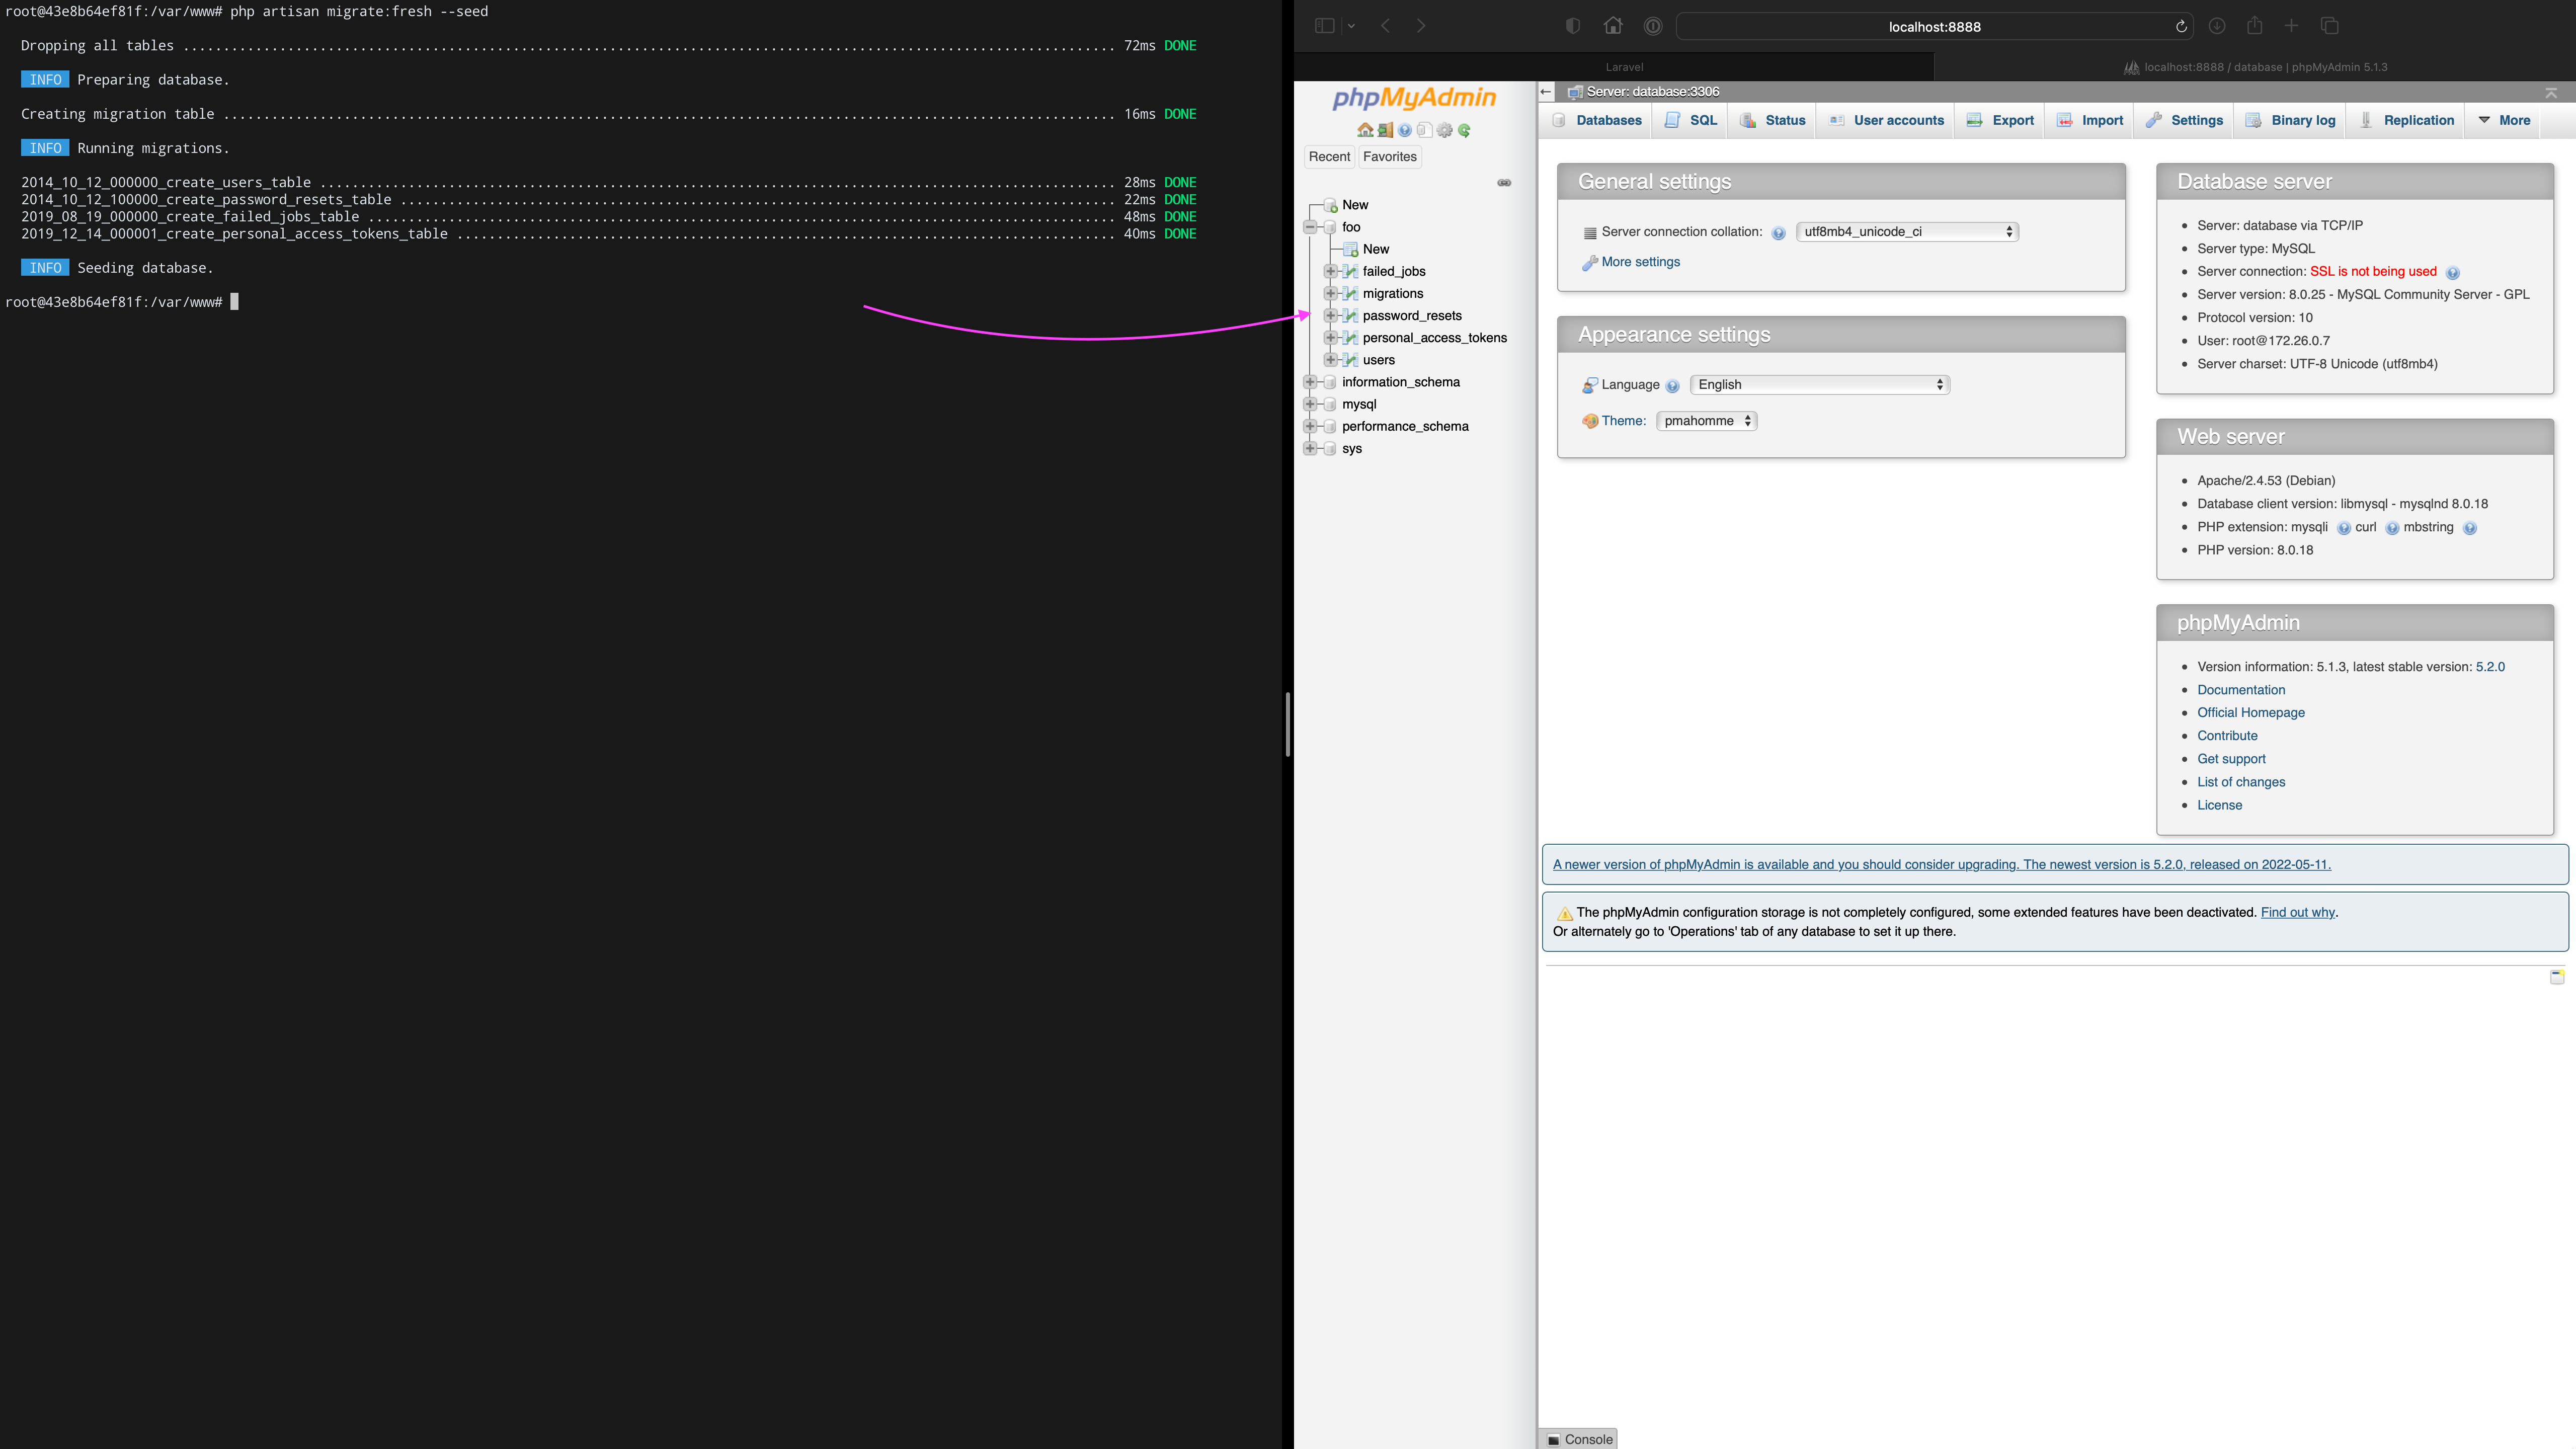
Refresh phpMyAdmin. Bang! The database is both migrated and seeded.
Type:
ls -alh ~/Code/foo-com/docker/volumes/mysql/to see how Docker uses a dedicated volume to persist any data, this is the final evidence that everything is correct here.
💡 If you prefer to use a different client to manage your application's database, you are free to do so. Following connection works just fine in Sequel Ace.
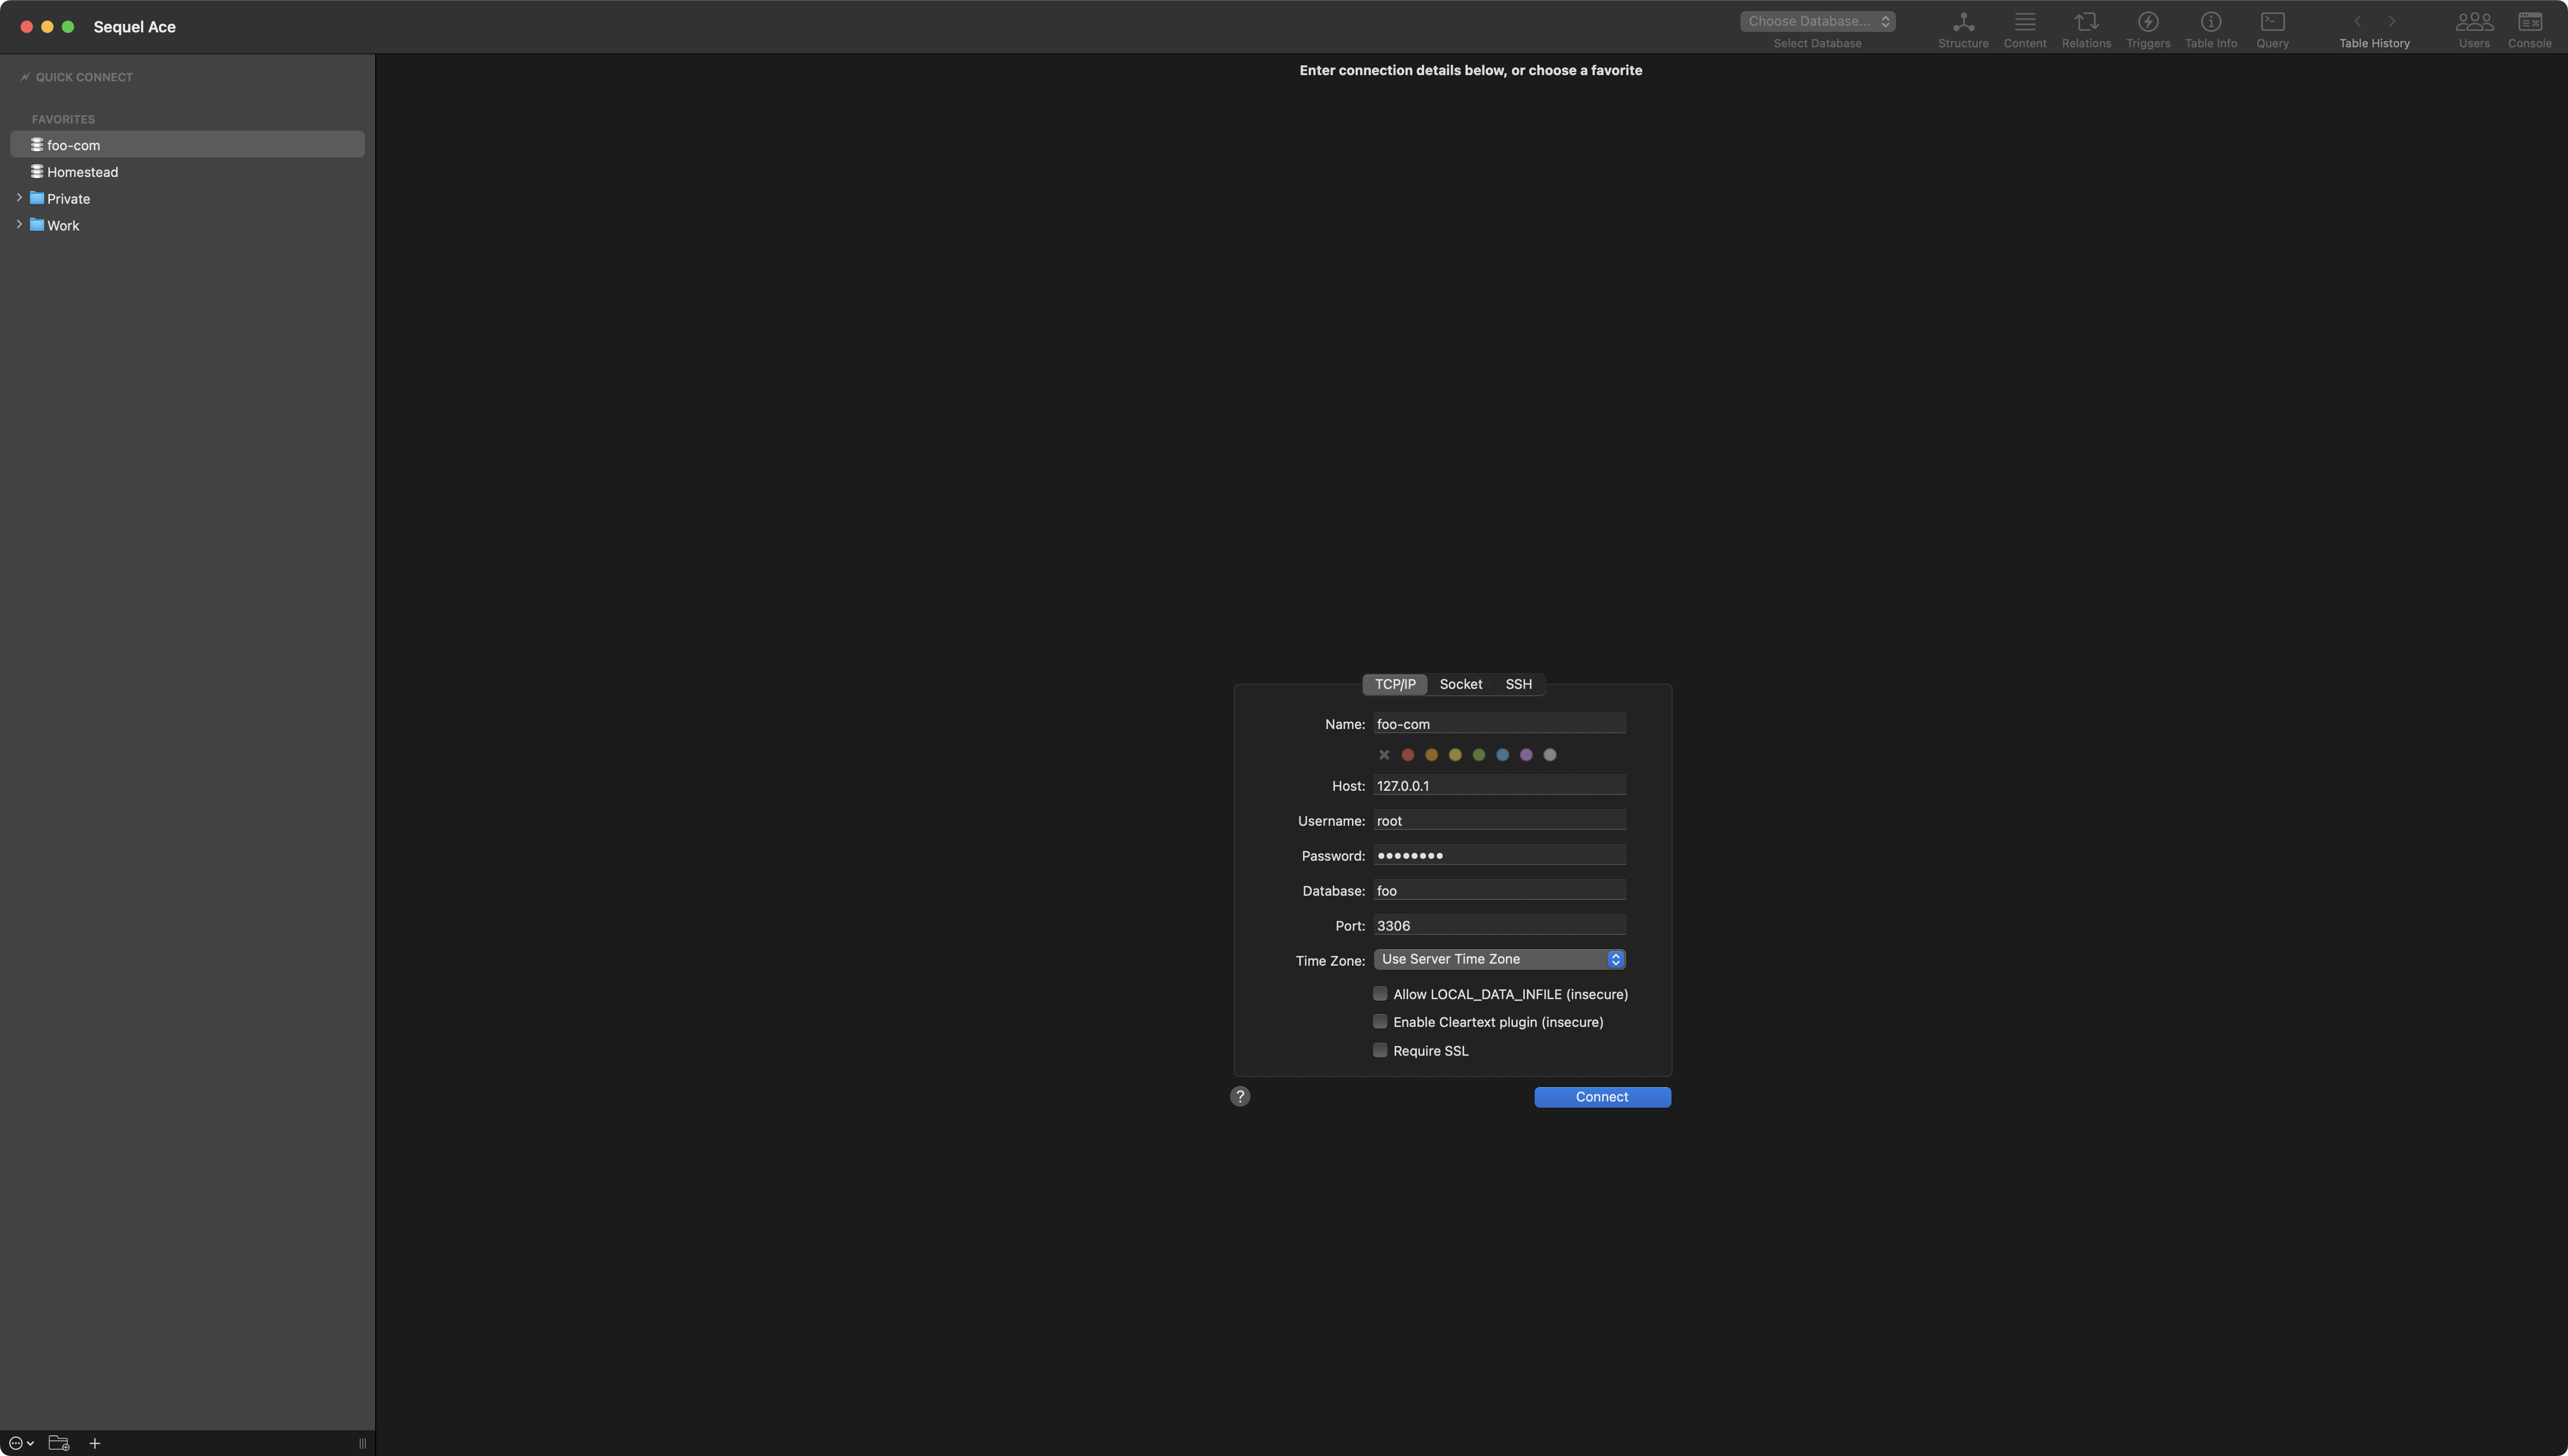
127.0.0.1 as host to successfully establish a connection with the database container.Cache Access
In this chapter we are going to consume Laravel's caching to see how it works with a Redis container. To start we have to install predis/predis package using Composer.
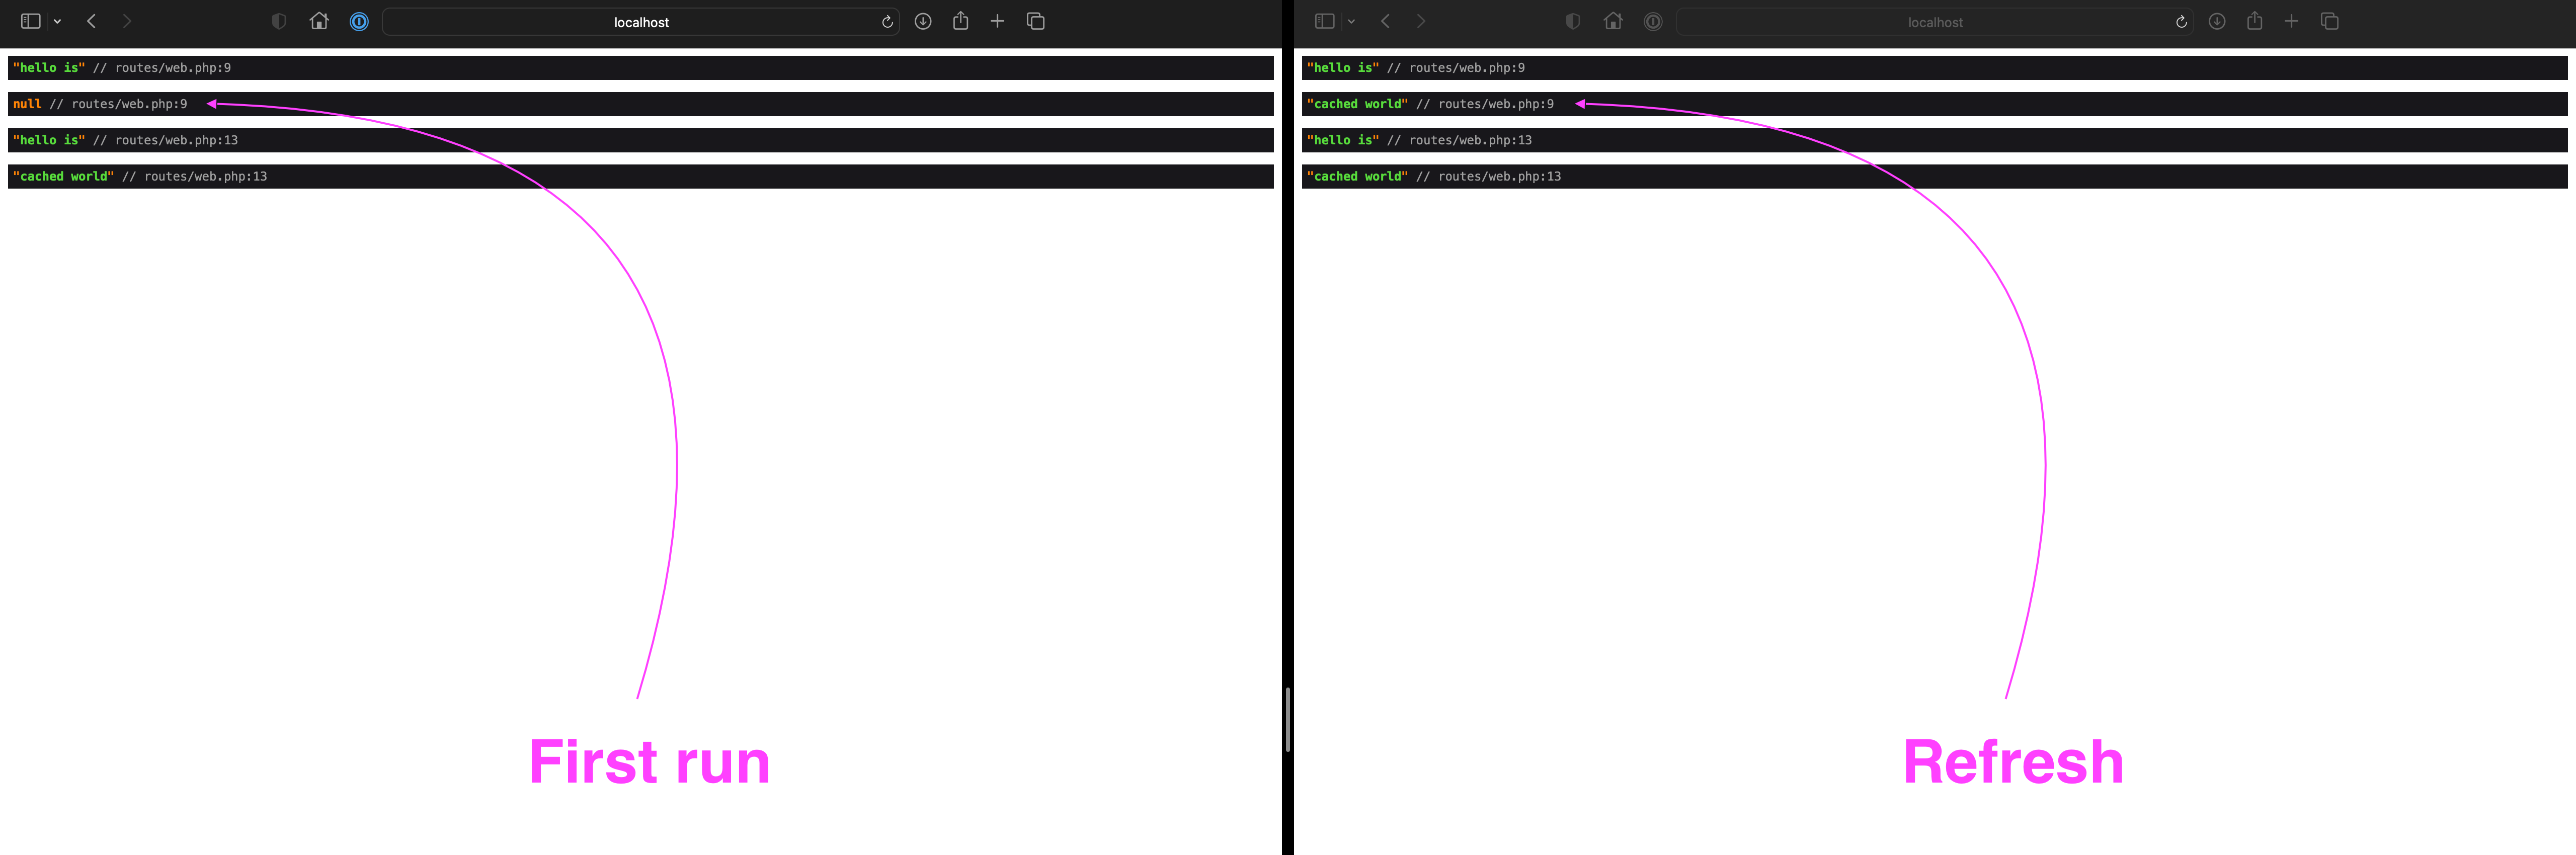
Now to quickly test caching, let's temporarily set the home route (probably under web.php) to a closure with the following code.
<?php

use Illuminate\Support\Facades\Cache;
use Illuminate\Support\Facades\Route;

Route::get('/', function () {
    $key = 'hello';

    dump('hello is', Cache::get($key));

    Cache::put($key, 'cached world', now()->addMinutes(10));

    dump('hello is', Cache::get($key));
});
Now follow this order of actions:
- In the app container clear the cache via
php artisan cache:clear - Open
http://localhost. First dump should benullas the string has never been cached yet - Refresh the page, both dumps show cached string
Mailing and Laravel Scheduler
In the last chapter we are going to test both Mail Server based on Mailhog and also evaluate if Laravel Scheduler works correctly. Let's do both at once by creating an Artisan Console command that is going to be responsible for sending dummy e-mail. The command will be scheduled to run every minute.
Type php artisan make:command SendDummyEmail.
root@43e8b64ef81f:/var/www# php artisan make:command SendDummyEmail

   INFO  Console command [app/Console/Commands/SendDummyEmail.php] created successfully.

root@43e8b64ef81f:/var/www#
Let's open newly created class at:
~/Code/foo-com/src/app/Console/Commands/SendDummyEmail.phpAs content use the following snippet:
<?php

namespace App\Console\Commands;

use Illuminate\Console\Command;
use Illuminate\Support\Facades\Mail;

class SendDummyEmail extends Command
{
    protected $signature = 'send:dummy-email';
    protected $description = 'Sends dummy e-mail';

    public function handle()
    {
        Mail::raw('Hello foo-bar!', function ($message) {
            $message->to('foo@bar')->subject('You should get this message every minute…');
        });

        return Command::SUCCESS;
    }
}
Let's manually trigger the command by typing:
php artisan send:dummy-emailNow go to http://localhost:8025 to open Mailhog. New message should be waiting for you.

Finally let's see if Laravel is able to do the same on a recurring basis.
Open Kernel.php at app/Console/ and within the schedule method, define newly created command to be triggered every minute. This is the highest frequency we can get.
The following code shows how the Kernel class might look like.
<?php

namespace App\Console;

use Illuminate\Console\Scheduling\Schedule;
use Illuminate\Foundation\Console\Kernel as ConsoleKernel;

class Kernel extends ConsoleKernel
{
    protected function schedule(Schedule $schedule)
    {
        $schedule
            ->command('send:dummy-email')
            ->everyMinute();
    }

    protected function commands()
    {
        $this->load(__DIR__.'/Commands');

        require base_path('routes/console.php');
    }
}
All we have to do right now is to take a short ☕️ break. Do not rush and come back after a while.
Once again open http://localhost:8025 to see Mailhog.

Summary
So here is your application. Fully-operational on a dockerized LEMP environment. This is a seamless starting point from where you can start building any type of software. From a mono-repo to a micro-service oriented approach.
I hope you find this tutorial useful. Feel free to adjust each bit to your needs.